|
|
||
|---|---|---|
| coraleda/subc | ||
| geda/symbols | ||
| library@88c3a0cbb8 | ||
| picture | ||
| .gitignore | ||
| .gitmodules | ||
| .qeda.yaml | ||
| CHANGELOG.md | ||
| DEVELOPMENT.md | ||
| LICENSE.txt | ||
| README.md | ||
| Rakefile | ||
| gafrc | ||
| hdmi_firewall.lht | ||
| hdmi_firewall.sch | ||
| mass_prop.sh | ||
| pnp_fab.tab | ||
| version | ||
README.md
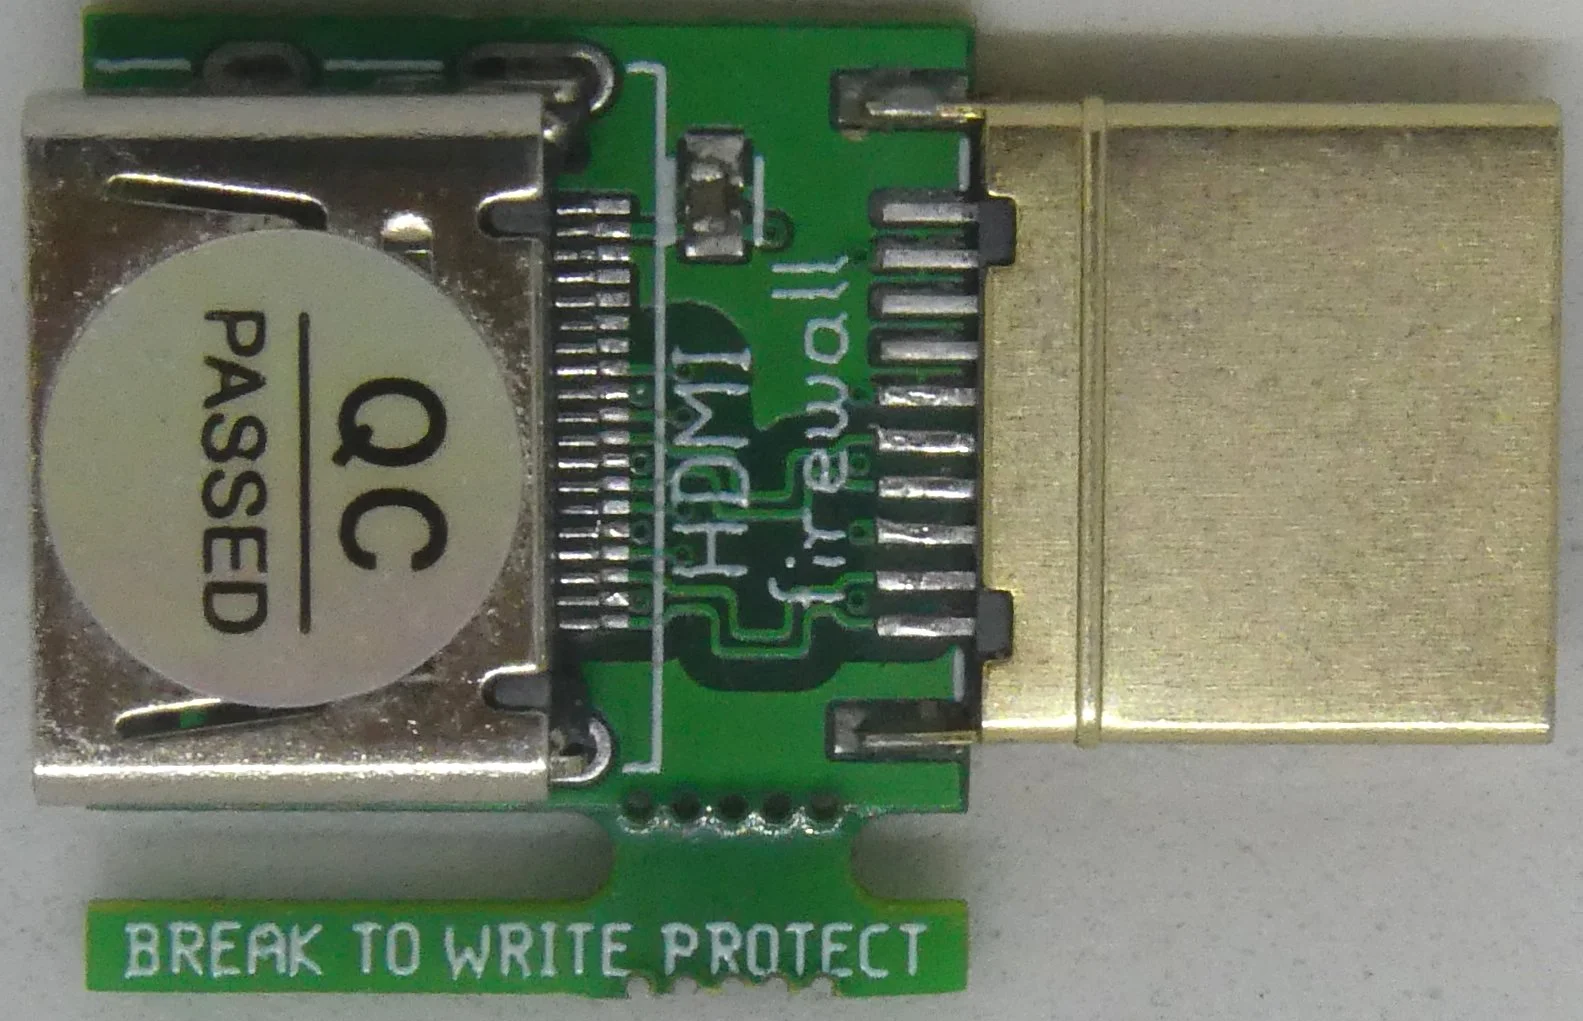
The HDMI firewall prevents devices from hacking HDMI equipment, and vice-versa.


purpose
HDMI is mainly used to transfer audio and video, but also offers a number of additional features (e.g. HPD, CEC, HEAC, MHL). This increases the attack surface, and since the security of their implement in embedded devices is far from ideal, an attacker could exploit them and inject malicious code. Now your unsuspicious video equipment is compromised and threatens your IT/network security. And your monitor could then in turn hack back any other device connected to it.
For example, let's imagine you invite an external guest for a presentation inside your company. You offer to connect to a video-projector so he can show his slides. This is the perfect opportunity for the guest to hack the video-projector. Next time an employee connects to this projector, his laptop is hacked back. And voila, the innocent guest managed to infiltrate your company network, and can exfiltrate confidential information.
The HDMI firewall blocks all additional interfaces, and only allows audio and video data transfer. It is based on the research of Pierre-Michel Ricordel and José Lopes Esteves from ANSSI/SDE/ST/LSF presented at the IT security conference SSTIC 2021. Some security research and vulnerabilities around CEC and EDID are listed in slide 4.
usage
The HDMI firewall comes with a generic HD profile, but this might not correspond to the capabilities of your monitor. The resulting image could be distorted, or completely missing. Thus, you first have to copy the Extended Display Identification Data (EDID) information of the equipment to protect. This data includes information such as the supported resolutions. You can read it out using the I²C-based Display Data Channel (DDC) interface. Copy this EDID data on the EEPROM of the HDMI firewall, and break the tab using pliers to enable write protection. It will prevent attackers from injecting any malicious payload. This only has to be done once (per monitor to protect). Copying the EDID can be done using the HDMI firewall programmer, or following the instructions under installation.
Plug in the HDMI firewall in the monitor to be protected. Connect the cable going to the untrusted device on the HDMI firewall. Your equipment is now protected.
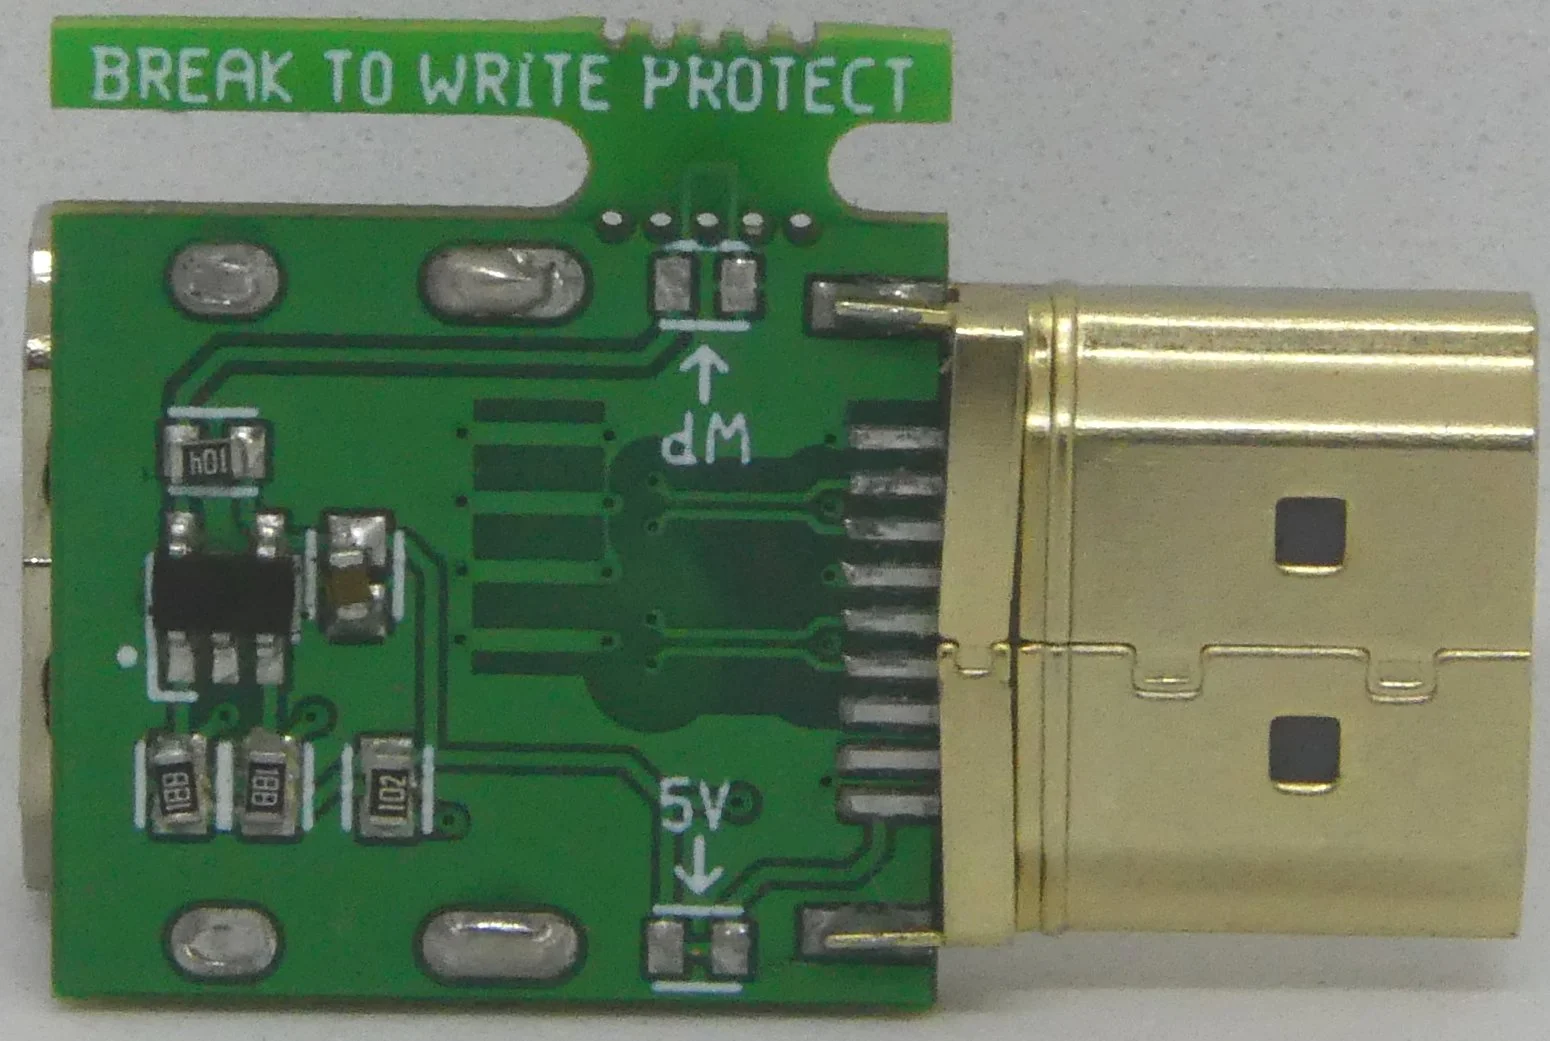
To re-write the EEPROM of the HDMI firewall in case you want to protect another monitor, you can re-disable write protection by putting a solder blob across the two pads marked WP.
By default, the 5V supplied by the device is forwarded to the monitor. To further reduce the attack surface, you can disable this by cutting the trace between the two pads marked 5V. The risk is that some monitors rely on this signal to detect when a device is plugged in.
limitations
High-bandwidth Digital Content Protection (HDCP) is not supported since the DDC interface is limited to the EDID information.
availability
A few HDMI firewalls are available on tindie.
The schematic pdf and board gerbers are available as release.
The next version should have the HDMI firewall programmer integrated, and maybe some fixes reported by other users (I only tested for my simple case, and with 6 monitors).
mode of operation
To protect the monitor, the HDMI firewall only forwards the signal lines used for audio/video (A/V) data transfer (D0, D1, D2, CK). All other signal lines are unconnected (CEC, SDA, SCL, utility/HEAC+, HPD). This will block all non A/V interfaces (e.g. DDC, HPD, CEC, HEAC, MHL) The SDA/SCL lines used for the DDC interface to provide the EDID information to the device are connected to an EEPROM on the firewall. This is where you need to copy the monitor information to. This limits the DDC interface to the EDID information.
installation
For the HDMI firewall to be used correctly, it needs a copy of the EDID data from the monitor to protect.
These instructions are for Linux. For Windows see the instructions provided in the original research slides (untested).
Install tools to read/write I²C devices:
- for Debian-based distributions
sudo apt install i2c-tools
Make the I²C buses user accessible (under /dev/i2c-*):
sudo modprobe i2c-dev
Now we have to figure out which I²C bus corresponds to the HDMI port. First list the available buses:
sudo i2cdetect -l
You should see something like this:
i2c-0	smbus     	SMBus PIIX4 adapter port 0 at 0b00	SMBus adapter
i2c-1	smbus     	SMBus PIIX4 adapter port 2 at 0b00	SMBus adapter
i2c-2	smbus     	SMBus PIIX4 adapter port 1 at 0b20	SMBus adapter
i2c-3	i2c       	AMDGPU DM i2c hw bus 0          	I2C adapter
i2c-4	i2c       	AMDGPU DM i2c hw bus 1          	I2C adapter
i2c-5	i2c       	AMDGPU DM i2c hw bus 2          	I2C adapter
i2c-6	i2c       	AMDGPU DM i2c hw bus 3          	I2C adapter
i2c-7	i2c       	AMDGPU DM aux hw bus 0          	I2C adapter
i2c-8	i2c       	AMDGPU DM aux hw bus 2          	I2C adapter
i2c-9	i2c       	AMDGPU DM aux hw bus 3          	I2C adapter
i2c-10	i2c       	DPMST                           	I2C adapter
i2c-11	i2c       	DPMST                           	I2C adapter
Candidate buses are 3 to 9, used by the GPU (number after i2c- in the first column).
Disconnect everything from the HDMI port, and scan for devices on each I²C bus (replace BUS with the bus number):
sudo i2cdetect -y BUS
Since nothing is connected, no device should be detected, and the output should look like this:
     0  1  2  3  4  5  6  7  8  9  a  b  c  d  e  f
00:                         -- -- -- -- -- -- -- --
10: -- -- -- -- -- -- -- -- -- -- -- -- -- -- -- --
20: -- -- -- -- -- -- -- -- -- -- -- -- -- -- -- --
30: -- -- -- -- -- -- -- -- -- -- -- -- -- -- -- --
40: -- -- -- -- -- -- -- -- -- -- -- -- -- -- -- --
50: -- -- -- -- -- -- -- -- -- -- -- -- -- -- -- --
60: -- -- -- -- -- -- -- -- -- -- -- -- -- -- -- --
70: -- -- -- -- -- -- -- --
Now connect the HDMI firewall on the device side to your HDMI port and re-scan for devices. If you see the following result, you found the I²C bus of the HDMI port. Else continue with the next bus.
     0  1  2  3  4  5  6  7  8  9  a  b  c  d  e  f
00:                         -- -- -- -- -- -- -- --
10: -- -- -- -- -- -- -- -- -- -- -- -- -- -- -- --
20: -- -- -- -- -- -- -- -- -- -- -- -- -- -- -- --
30: -- -- -- -- -- -- -- -- -- -- -- -- -- -- -- --
40: -- -- -- -- -- -- -- -- -- -- -- -- -- -- -- --
50: 50 51 52 53 54 55 56 57 -- -- -- -- -- -- -- --
60: -- -- -- -- -- -- -- -- -- -- -- -- -- -- -- --
70: -- -- -- -- -- -- -- --
Now connect the monitor you want to copy the EDID from directly to the HDMI port.
We will use the EEPROM module to dump the EDID:
sudo modprobe eeprom
Display the EDID overview and ensure the Model Name corresponds to your monitor (here a DELL 2408WFP on bus number 4):
ddcmon 4

Checksum:               OK
EDID Version:           1.3
Manufacturer ID:        DEL
Model Number:           0xA02C
Model Name:             DELL 2408WFP
Serial Number:          G286H9642GLS
Manufacture Time:       2009-W23
Display Input:          Digital
Monitor Size (cm):      52x32
Gamma Factor:           2.20
DPMS Modes:             Active Off, Suspend, Standby
Color Mode:             RGB Multicolor
Vertical Sync (Hz):     56-76
Horizontal Sync (kHz):  30-83
Max Pixel Clock (MHz):  170
Timing:                 640x480 @ 60 Hz
Timing:                 640x480 @ 75 Hz
Timing:                 720x400 @ 70 Hz
Timing:                 800x600 @ 60 Hz
Timing:                 800x600 @ 72 Hz
Timing:                 800x600 @ 75 Hz
Timing:                 1024x768 @ 87 Hz (interlaced)
Timing:                 1024x768 @ 75 Hz
Timing:                 1152x864 @ 75 Hz
Timing:                 1280x1024 @ 60 Hz
Timing:                 1600x1200 @ 60 Hz
Timing:                 1920x1200 @ 60 Hz
Dump the complete EDID (replace BUS with corresponding bus number):
cat /sys/bus/i2c/devices/BUS-0050/eeprom > edid.bin
Connect the HDMI firewall device port to your HDMI output. Ensure Write Protect is disabled (by default until the tab is broken, and no solder across the WP pads is added). WARNING: writing data to the wrong I²C bus could permanently damage your computer or other devices.
Free the I²C access to the EEPROM:
sudo modprobe -r eeprom
Write the extracted EDID data to the HDMI firewall (replace BUS with corresponding bus number):
for addr in `seq 0 255`; do echo $addr; sudo i2cset -y BUS 0x50 $addr 0x`xxd -p -l 1 -s $addr edid.bin`; done
To verify the data has been written correctly, compare original data with the one on the EEPROM:
# display original dumped data
xxd -g 1 edid.bin
# display data written on EEPROM
sudo i2cdump -y BUS 0x50
Once writing the EDID to the HDMI firewall memory succeeded, break the tab using pliers to write protect the memory. This will prevent attackers from storing a malicious payload. You can now use the HDMI firewall (only for this monitor).
Feel free to put shrink tube or tape around the HDMI firewall. This will prevent the electronics from getting shorted when entering in contact with neighbouring metal objects.
troubleshooting
If the monitor does not detect the device or does not display anything (but should), try to re-enable the 5V forward (as per default) by putting solder across the 5V pads. In the HDMI cable there is a 5V line, with power provided by the device. In our case we use it is to power the HDMI firewall memory. Forwarding it to the monitor can be disabled by cutting the trace across the 5V pads.
If the device does not detect the monitor or HDMI firewall, or writing the EDID data to the HDMI firewall fails (better indication), try connecting the HDMI firewall with another (better quality) HDMI cable.
tips
xrandr
xrandr can also dump the EDID information:
xrandr --properties
sysfs
sysfs also exposes the raw EDID information (change path accordingly):
edid-decode /sys/devices/pci0000:00/0000:00:08.1/0000:05:00.0/drm/card0/card0-HDMI-A-1/edid
I²C non-root
to access I²C buses as non-root:
# add UDEV rule
cat << EOF | sudo tee /etc/udev/rules.d/20-i2c.rules
KERNEL=="i2c-[0-9]*", GROUP="i2c"
EOF
# give user access to devices (you have to re-login in for the change to take effect)
sudo groupadd i2c
sudo gpasswd -a $USER i2c
# reload rules
sudo udevadm control --reload-rules
sudo udevadm trigger
erase
If you want to clear the HDMI firewall memory (for usage with another monitor):
for page in `seq 50 57`; do echo 0x$page; for addr in `seq 0 255`; do echo $addr; sudo i2cset -y BUS 0x$page $addr 0xff; done; done
edid-decode
To parse and display the complete EDID information, you can use edid-decode.
- for Debian-based distributions
sudo apt-get install edid-decode
- for Arch-based distributions
pikaur -S edid-decode-git
To view the dumped EDID information:
edid-decode edid.bin
edid-rw
EDID-RW makes reading and writing EDID a bit easier.
Install these prerequisites:
- for Debian-based distributions
sudo apt-get install python3-smbus
- for Arch-based distributions
pikaur -S python-smbus-git
Get EDID-RW:
git clone https://github.com/bulletmark/edid-rw
cd edid-rw/
To retrieve the EDID data from the monitor you connected:
sudo ./edid-rw 4 > edid.bin
To write the dumped EDID on the HDMI firewall memory:
sudo ./edid-rw -w 4 < edid.bin
To verify of the data has been written correctly, read it back:
sudo ./edid-rw 4 | edid-decode